
SALE INVOICES / PURCHASE INVOICES
Select the SALES INVOICES/PURCHASE command or the graphic toolbar icons ![]()
![]()
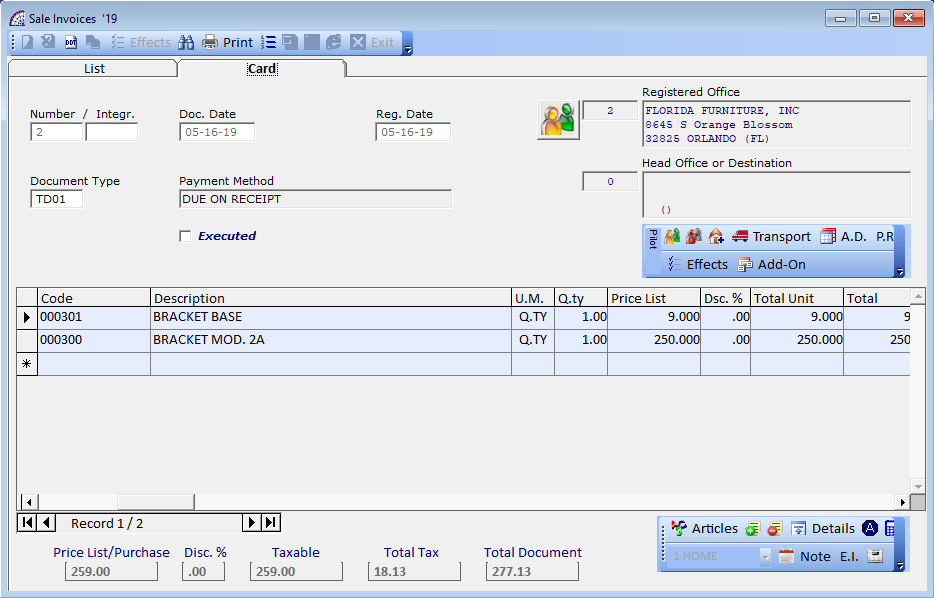
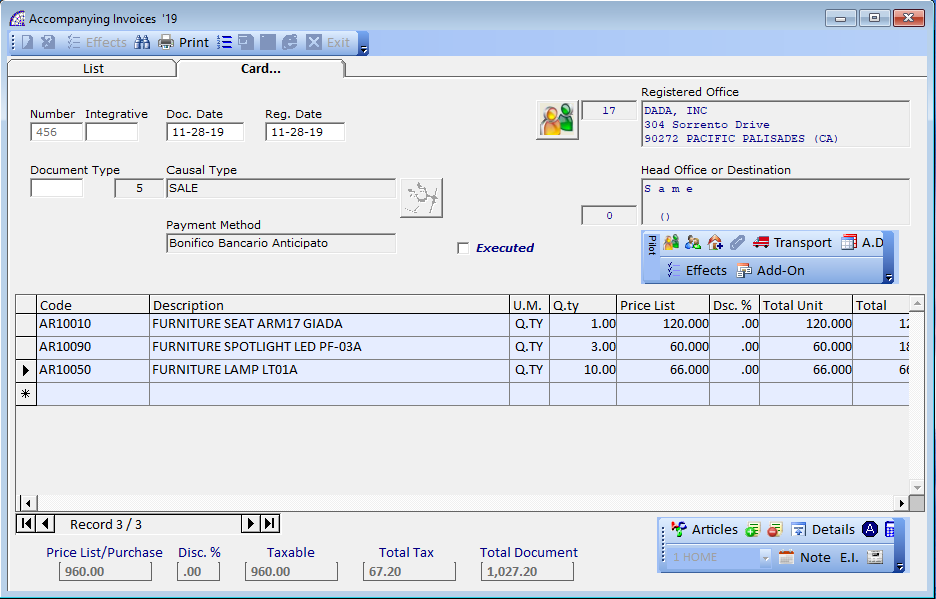
![]() generates a new document (function key “F4”). The numbering can be changed until the document is confirmed, similarly applies to the document date “Doc. Date”. The document is confirmed when it is closed.
generates a new document (function key “F4”). The numbering can be changed until the document is confirmed, similarly applies to the document date “Doc. Date”. The document is confirmed when it is closed.
To move to the other fields without using the mouse press the “Tab” key from the keyboard, to confirm a value just inserted, always move the cursor with the “Tab” key or click with the mouse on another field.
“Integr.”: this field is used in 3 different ways:
-
- as an additional number, if a value is inserted in the first invoice of the year, it will be automatically reported in the subsequent invoices;
- for the management of the “attempted sale”, where each terminal will have progressive numbering with a dedicated suffix, to be distinguished from the others, this can be set in the configuration of @/Arpro in “Integrative No.” (main menu “Settings” + “Configuration”);
- to add an invoice among others with existing numbering, for accounting needs.
In the latter case, proceed as follows: create the invoice and leave the document number that the program proposes, add the text “Integr.” in the appropriate field and then change the numbering in the “Number” field, afterwards you could insert the other data as document date, etc.
“Doc. Date”: date of the document, which must respect the progressivity with the number of compared to the previous invoice entered.
“Reg. Date”: date of registration of the “Accounting Records”, important for the date of Tax data.
“Purch. Inv. No.”: supplier invoice number (for purchase invoices only);
“Executed”: value managed by the program, also used for the creation of manual “Bank Receipts”. If active indicates that the bank receipt has already been generated in the bank account, from the corresponding “Scheduled Payment”.
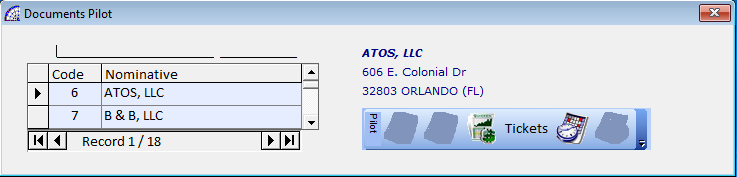
![]() to enter the customer/supplier details (or press “F3” from the keyboard).
to enter the customer/supplier details (or press “F3” from the keyboard).
In some cases, it is also possible to replace the master data entered in the document, with another existing one or with the same one after changing some basic data in it.
In any case it is possible to replace the master data before entering data (or after removing them) in the body of the document, such as articles and/or various descriptions and notes.
“Payment method”: proposes that of the “Master data” and can be replaced at any time. It allows the management of the “Scheduled Payments” (from main menu “Documents” + …), of the “Accounting Payments” (from main menu “Accounting” + “Customer/Supplier Payments” + …).
The changing of the invoice payment is effective only for the selected document, it does not change anything for the original master data.
An accounting evaluation considers scheduled payments generated by fiscal documents such as sales and purchase invoices, as well as accompanying invoices, invoice receipts and credit notes.
For each document created, the program automatically generates a “Scheduled Payments” and “Accounting Payments”, perfectly connected to the original document: these deadlines are updated with every change made to the latter.
The first one is useful for those who want to manage those kinds of deadlines in a very simple way, without any accounting competence necessary. The second one is necessary for the “Accounting Records”, completely and efficiently. It also permits obtaining “Customers/Suppliers account statements” that could be sent to the master data, as a complete scenario of the payments.
Both systems are connected to each other and to the general ledger, where they automatically generate records when a payment is confirmed in real-time.
The invoice may contain encoded warehouse articles or simple descriptions by typing them directly in the description column (in this case there is no movement of the warehouse inventory).
Insertion of articles in documents:
-
- press the “Articles” button (function key “F2” or with the mouse)
- if the “Auto Articles” management is activated (from document’s toolbar, in the bottom), type at least three characters in the code or description fields and press enter from the keyboard. To make this management a default is necessary to activate the same flag in configuration: main menu “Settings” + “Configuration” + “Variables”.
Only by using these 2 methods will there be movements of the warehouse inventory, changing the availability of quantity.
![]() add an empty line above the selected line, this allows you to insert another article or description in the same position or it can be left empty.
add an empty line above the selected line, this allows you to insert another article or description in the same position or it can be left empty.![]() delete the selected line (simple description or warehouse article).
delete the selected line (simple description or warehouse article).
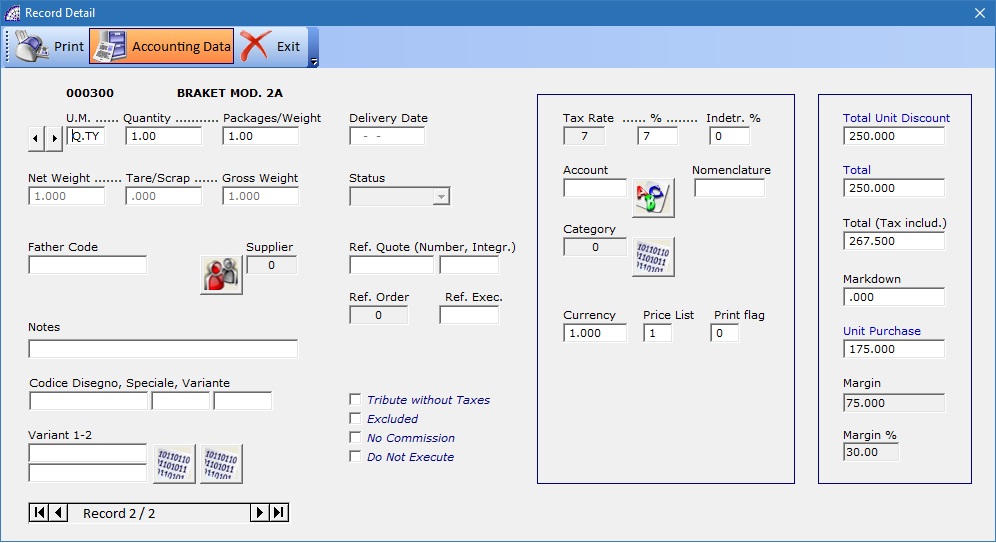
“Details”: opens the window with the details of the selected article or description.
![]() recalculate and update the document (prices, payment deadlines and accounting). It is useful only to force the data already calculated automatically from the program.
recalculate and update the document (prices, payment deadlines and accounting). It is useful only to force the data already calculated automatically from the program.![]() the reference of the warehouse article establishes where the program moves the articles.
the reference of the warehouse article establishes where the program moves the articles.
The default is the first, you should eventually change it before inserting lines in the document.
“Note”: opens a window where you can insert more lines of text, by pressing the “Save” button you are then brought back to the document with the same formatting.
“Professional invoices”
For sales invoices, the issue of billing subject to withholding tax is to be considered separately. These invoices usually affect professionals or companies that have representative duties.
@/Arpro distinguishes sales invoices from invoices subject to withholding during the selection of the customer master data.
If the “Subject Withholding” flag is active (from the master data window, the “Card” tab + “Other” toolbar button), the form used in the printout will be “Professional Invoice” and not the normal “Sale Invoice”.
This is a print form dedicated to these particular invoices, that request specific graphic customization on the “Setting Modules” (main menu “Settings”).
This option is so that we can have customers with normal management and customers subject to withholding tax, that share the same program at the same time. In this case the only thing necessary is setting the specific parameters in configuration: main menu “Settings” + “Configuration” + press the “Withholding Account Parameters” button.
Another possibility is having to manage all sales invoices with the management of the withholding tax. In this case, the “Professional” flag must also be activated in the configuration in addition to the parameters described above.
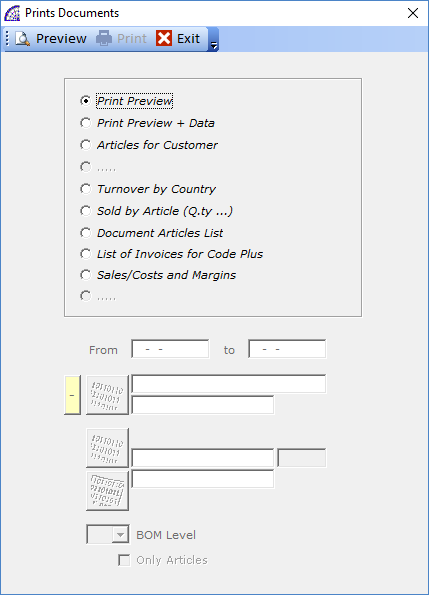
![]() print the single invoice (function key “F8”).
print the single invoice (function key “F8”).
By pressing the same button from the “List” tab, you can print different reports depending on the type of document that you are working on.
![]() delete the selected document (function key “F5”), the articles in the document are restored to the warehouse inventory, unless it is a summary invoice that came from transport documents. In this last case, the invoice shows the “No Moves in the Warehouse” flag enabled (from the invoice, select the toolbar button “A.D.”, Accounting data).
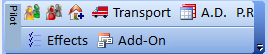
delete the selected document (function key “F5”), the articles in the document are restored to the warehouse inventory, unless it is a summary invoice that came from transport documents. In this last case, the invoice shows the “No Moves in the Warehouse” flag enabled (from the invoice, select the toolbar button “A.D.”, Accounting data).![]() allows the manual insertion of the “Transport documents” on the invoice, the window opens with the list of documents to be invoiced for the same customer or supplier, if respectively you are in the sales or purchase invoices.
allows the manual insertion of the “Transport documents” on the invoice, the window opens with the list of documents to be invoiced for the same customer or supplier, if respectively you are in the sales or purchase invoices.
For the automatic creation of sale invoices look at the Automatic Sale Invoices” (applies only to sales), in the main menu “Documents” + “Automatic …” + “… Sale Invoices”.![]() “Duplicate Document”: to duplicate the current document.
“Duplicate Document”: to duplicate the current document.
retrieves the number of a canceled invoices (excluding the last one that is automatically recovered), to keep the progression of numbers and dates of documents. Activate this button and then press the button ![]() .
.
For the compilation of the documents, what is described in the sale/purchase invoices applies.
“Transport Document”: it needs a warehouse causal to be selected from the list available; the program uses No.5, SALE” by default during the creation of the document (if the customer selected does not have a different one previously set). The warehouse causal can be changed as long as there are no records inserted in the document.
“Load Transp. Doc.”: The same considerations apply as those to “Transport Documents”, only that the proposed causal is the No. 3 “PURCHASE”.
“Accompanying Invoices”: The same considerations apply as those to “Transport Documents”.
![]() only for “Load Transport Documents”, allows the creation of so-called “Inverse Movements”, that during the execution process make an inverse process in the warehouse inventory, compared to the original movement.
only for “Load Transport Documents”, allows the creation of so-called “Inverse Movements”, that during the execution process make an inverse process in the warehouse inventory, compared to the original movement.
E.G.: from a “COMMITMENT TO CUSTOMER” to a “SALE”, from a “SUPPLIER ORDER” to a “PURCHASE”, from a “FOR WORK” to a “RENDERED WORKED”, etc.
Not all movements allow this automatism, it depends on the causal chosen for them. If you select a causal that does not allow it and try to execution process, it will give the message “Operation denied!”.
The “Causal” is the main element that defines the behavior of the movement in the warehouse inventory, they can be customized from the main menu “Master data” + “Warehouse Causals”.
Some of the main warehouse causals are already created and ready to be used in documents, others could be created to satisfy specific needs. In some of the documents the causal must be selected, in others it is fixed; such as invoices, orders and quotes, job orders.
It is an additional module of @/Arpro that allows for the management of the trade with the method of the attempted sale.
Normally it takes place in different locations apart from the headquarters, where it is necessary to have a query of the warehouse articles for availability, standard or customized sales price lists per customer, a management of customer orders and finally the possibility to invoice and deliver the goods sold.
From a hardware point of view, it is a system based on a computer and a portable printer and a customized module of attempted sale of the program.
In the case of several agents responsible for this particular type of sale (multi-user version), it is necessary to have a fixed computer for the management of the main warehouse and accounting records at the headquarters.
So, each agent has his own sales platform and a local warehouse of the articles sold (in the truck, van or car), a system to transmit and receive data with the headquarters. It is possible to receive the updated data of the central warehouse and to transmit the data relating to the sales made. These data transfers can also be done by email.
The agent can make sales using normal sales documents, such as sales invoices or accompanying invoices, just as if he were at the office; he will use a particular loading document to load the goods into his vehicle (local warehouse): “Attempted Sale Document”.
There is a specific tool to recharge in the program with the minimum stock of articles provided in the van, without having to intervene manually for daily, weekly or in any case of need.
The document management process is like other normal documents, but we find some specific features of the system.
- To start the process, you must create the “Attempted Sale Document”, the first thing you must do is insert the data in the “License Plate” field that is a mandatory field; only after having entered the vehicle registration plate the other fields are enabled to receive data.
It is necessary to create one “Attempted Sale Document” for each Terminal/Agent that uses this specific procedure. - The vehicle warehouse must then be loaded with the articles included in the document. The procedure is semiautomatic after connecting the remote terminal via cable or wi.fi to the central computer. If it is a multi-user version, the data is transferred by a specific procedure: main menu “Various” + “Imp./Exp. Attempted Sale”, select the “Send data to the Terminal” Tab and the “Load the vehicle’s warehouse” flag.
- After having loaded the warehouse of the vehicle from the business management software and obviously in the real way, it is possible to start the attempted sale process using the normal dedicated documents: sales invoice, accompanying invoice, invoice receipt, etc.
- Once sales are finished, probably at the end of the day or work week, it is necessary to import the sales documents for handling accounting, payments, etc. This operation also imports the inventories of non-sold articles, which then fall into the central warehouse of the company.
This operation is managed through a specific procedure: main menu “Various” + “Imp./Exp. Attempted Sale”, select the “Receive data …” Tab and the “Sale documents” flag, where you select document by document from the combo-box to be imported into the central system.
In the document of “Attempted Sale Document” the value of the remaining unsold articles is written in the “Q.ty Deliv.” Column, in the document’s body.![]() lists all the documents.
lists all the documents.![]() duplicate the document for the next day or next week or when it is necessary to go out for attempting to sell. In this case the meaning of the quantity fields is as follows:
duplicate the document for the next day or next week or when it is necessary to go out for attempting to sell. In this case the meaning of the quantity fields is as follows:
“Q.ty”: reinstate the van with the same quantities specified in the following field.
“Q.ty – Q.ty Deliv.”: reinstate the van for only the quantities really left that day or the week before.
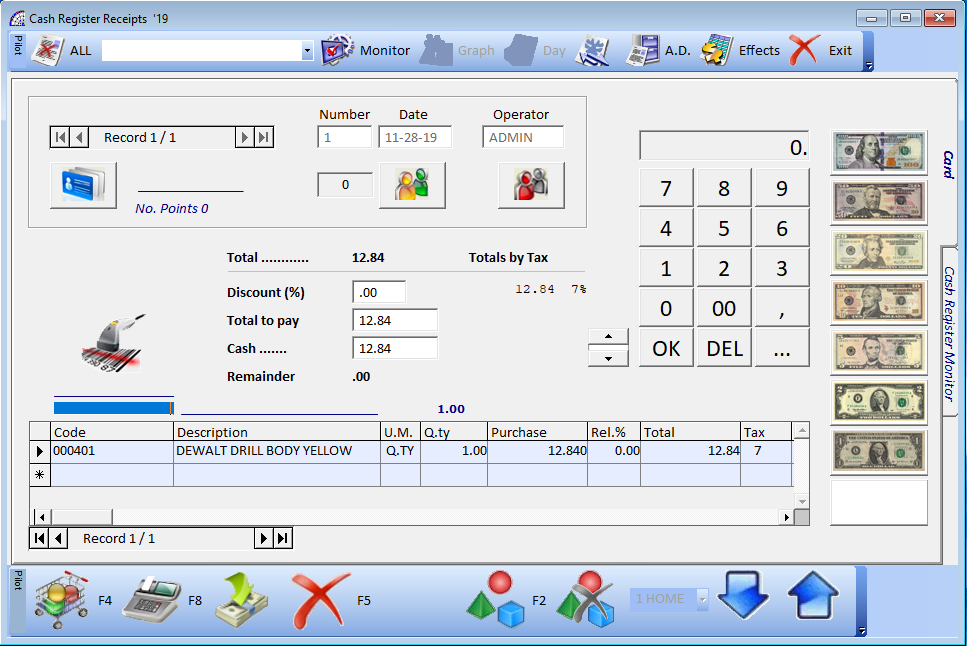


eliminates the selected cash register receipt (function key “F5”);
recalculates the total amounts of the selected cash register receipt.
To view already printed receipts move using the arrows in the following control:![]()
Management of the “Fidelity Card”: by inserting the customer’s personal details, the customer cards assigned and preloaded are displayed: the points are accumulated on each cash register receipt and it is possible to make a report to the customer.
Consult the manual section regarding the management of the “Fidelity Card”.
executes the daily closure in the “Accounting Records” of all receipts of the indicated day. To exclude those that are not printed, activate the button ![]()
The payment schedule shows all deadlines not yet confirmed, relating to invoices to customers or suppliers.
In the tab of sales all the references of the selected payment deadline are displayed. Between the sales deadlines we can find documents marked with the letters: V = Sale Invoices, A = Accompanying Invoices, N = Credit Notes.
In the tab of purchases there are no documents marked.![]() displays the total value of the displayed expirations only.
displays the total value of the displayed expirations only.![]() to confirm the payment. If the invoice has only one installment payment, the payment is canceled out(finalized), or the effect paid is marked with an asterisk and keeps the line until all of the installments have been paid.
to confirm the payment. If the invoice has only one installment payment, the payment is canceled out(finalized), or the effect paid is marked with an asterisk and keeps the line until all of the installments have been paid.
Consult the “Accounting Payments” in the manual of the Accounting for more information.